
셀레니움(Selenium)을 이용한 크롤링 [Python]
[ JavaScript 처리 ]
웹 페이지 중에는 JavaScript를 실행해야 가져올 수 있는 데이터가 있으며 그중에서도 비동기적으로 처리되어 나중에 불러지는 데이터도 있습니다. 크롤러에서 JavaScript를 해석하고 로딩에 시간차가 생기는 데이터를 처리하는 것은 까다롭습니다. 하지만 크롬 등의 브라우저에는 이들을 처리하는 기능들이 내장되어 있어 사용자가 쉽게 이용할 수 있습니다. Selenium은 브라우저를 이용한 웹 진단 프레임워크입니다. 우리는 Selenium으로 브라우저의 기능을 활용하여 복잡한 처리를 거치는 데이터를 쉽게 가져올 수 있습니다.
[ Selenium의 동작원리 ]

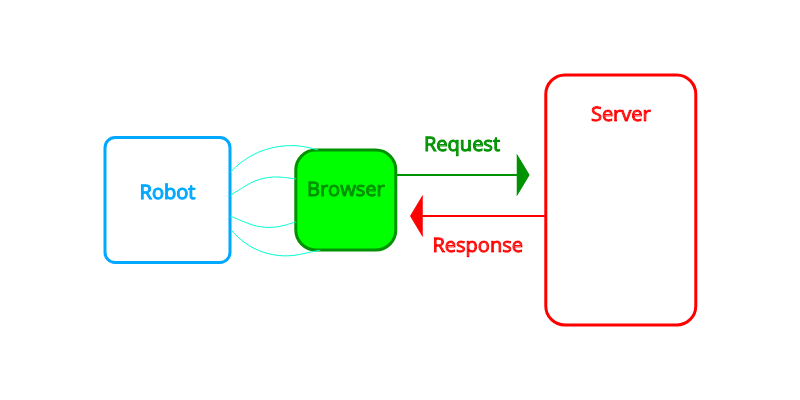
이전 포스터에서의 로봇이 브라우저의 역할을 대신했다면 여기 Selenium은 브라우저를 조종하는 로봇이라고 할 수 있습니다. 사용자 대신 브라우저에게 명령을 하여 처리한 데이터를 가져올 수 있습니다.
[ Selenium 시작하기 ]
selenium에서는 크롬(Chrome), 파이어폭스(FireFox), PhantomJS 등 여러 가지 브라우저를 이용할 수 있지만 여기서는 크롬(Chrome)을 이용하도록 하겠습니다.
-
Selenium 설치하기
> pip install selenium※ PATH에 pip 경로가 등록되어있지 않다면 python 경로 아래 scripts에서 실행해야합니다.
- 크롬 설치
Chrome 설치: https://www.google.com/chrome - Chrome Driver
Selnium에서 Chrome을 이용하기 위해서는 현재 크롬 버전에 맞는 Chrome Diver를 설치해야 합니다.
Chrome Driver 설치: https://sites.google.com/a/chromium.org/chromedriver/downloads
[ Selenium 사용법 ]
<Driver 생성>
driver = webdriver.Chrome()-
옵션 넣기
options = webdriver.ChromeOptions()
options.add_argument('lang=ko_KR')
options.add_argument('user-agent=googy bot')
driver = webdriver.Chrome(chrome_options=options)
<Element 찾기>
- findelementbytagname( ‘tag 명’ )
- findelementby_id( ‘id 명’ )
- findelementbyclassname( ‘class 명’ )
-
findelementby_xpath( ‘옵션’ )
XPath(XML Path Language)는 마크업 언어 구조의 문서에서 지정한 구문을 사용하여 경로를 나타내고 처리하는 언어입니다. 이를 이용하면 HTML에서 원하는 요소(Element)를 쉽게 얻을 수 있습니다.-
기본적인 단어는 tag를 지정합니다.
Tag가 p인 요소driver.find_element_by_xpath('//p') -
[] : 술부(Predicates)로 추가적인 조건을 명시하여 특정 요소를 찾을 수 있습니다.
-
@ : 속성을 지정할 때 표시합니다.
Tag가 div이면서 id 속성을 가진 요소driver.find_element_by_xpath('//div[@id]')Tag가 div이면서 id 속성 값이 "header"인 요소
driver.find_element_by_xpath('//div[@id="header"]')
-
-
/ : 경로 구분을 위해 나타냅니다. (맨 앞에 오면 최상위 노드에서 시작합니다.)
id가 header인 div 요소 > ul 요소 > li 요소driver.find_element_by_xpath('//div[@id="header"]/ul/li') -
// : 해당 경로 하위 노드 전체에서 검색합니다. (마찬가지로, 맨 앞에 오면 최상위 노드에서 시작합니다.)
id가 header인 div 요소 내부에서 li 요소 검색driver.find_element_by_xpath('//div[@id="header"]//li') -
* : 모든(불특정)
id 값이 "header"인 모든 엘리먼트driver.find_element_by_xpath('//*[@id="header"]//li')div 태그 중 어떤 속성값이라도 가지는 엘리먼트
driver.find_element_by_xpath('//div[@*]')div 태그 중 어떤 속성값이라도 "header" 값을 가지는 엘리먼트
driver.find_element_by_xpath('//div[@*="header"]//li')
-
element에 s를 붙이면 조건을 만족하는 모든 요소를 가져와 리스트처럼 사용할 수 있습니다.
- findelementsbytagname( ‘tag 명’ )
- findelementsby_id( ‘id 명’ )
- findelementsbyclassname( ‘class 명’ )
- findelementsby_xpath( ‘옵션’ )
<Data 입력하기>
- send_keys( str )
Element에 문자열을 입력합니다. 물론 input, textarea 등 입력이 가능한 Element 이어야 합니다. - click()
Element에 클릭합니다. button, submit, link 등 클릭이 가능한 Element 이어야 합니다.
<로딩 기다리기>
브라우저에 특정 페이지에 접속하라고 명령을 해두어도 비동기 처리 혹은 네트워크 상황에 따라 문서(DOCUMENT)에서 내가 찾는 Element가 로딩되지 않았을 수도 있습니다. 로딩이 끝나지 않은 문서에서 Element를 찾거나 입력을 준다면 오류가 발생할 수 있습니다. 이를 방지하기 위해서 Selenium에서는 브라우저에게 특정 Element가 존재할 때까지 기다리라고 명령할 수 있습니다.
from selenium import webdriver

from selenium.webdriver.common.by import By
from selenium.webdriver.support.ui import WebDriverWait
from selenium.webdriver.support import expected_conditions

DELAY = 10
url = "https://www.kaggle.com/"
driver = webdriver.Chrome()
driver.get(url)

WebDriverWait(driver, DELAY).until(expected_conditions.presence_of_all_elements_located((By.XPATH, '//a[@id="sign-in-button"]')))
driver.find_element_by_xpath('//a[@id="sign-in-button"]').click()[selenium expected_conditions] 내 여러 함수를 이용해 특정 조건을 지정하고 WebDriverWait()에서 Delay를 줄 수 있습니다.
<Other Tips>
-
Alert() 처리하기
WebDriverWait(driver, DELAY).until(expected_conditions.alert_is_present()) check_alert = webdriver.common.alert.Alert(driver) check_alert.accept() -
새 윈도우로 전환하기
window_before = driver.window_handles
# 여기에 새 윈도우 창을 띄우는 작업
WebDriverWait(driver, DELAY).until(expected_conditions.new_window_is_opened(window_before))
driver.switch_to.window(driver.window_handles[-1])
[ 예제: Kaggle 로그인하기 ]
Kaggle에서는 Google, Facebook 등의 SSO 인증을 지원합니다. Selenium을 이용하면 구글의 복잡한 로그인 처리, SSO 인증을 간편하게 수행할 수 있습니다.
<Settings>
- Python
2.7.16 - Selenium
3.141.0 - Chrome
77.0.3865.75 (공식 빌드) - Chrome-Drvier
77.0.3865.40
먼저 Kaggle에 접속해 우리가 자동으로 수행할 부분을 찾아줍니다.

Chrome 개발자 도구에서 원하는 Element 우클릭 > Copy > Copy XPath를 사용하면 XPath를 얻을 수 있습니다. ( 다만, 저는 한 번 만든 프로그램은 오래 사용하길 원하기 때문에 페이지의 변경 가능성을 고려하여 XPath를 직접 작성하는 것을 선호합니다. )
# -*- coding: utf-8 -*-

from selenium import webdriver
from selenium.webdriver.common.by import By
from selenium.webdriver.support.ui import WebDriverWait
from selenium.webdriver.support import expected_conditions
import getpass

DELAY = 30
url = "https://www.kaggle.com/"
GOOGLE_ID = raw_input("Google ID:")
GOOGLE_PW = getpass.getpass()

driver = webdriver.Chrome()
driver.get(url)

# 로그인 > 구글 로그인
driver.maximize_window() # Kaggle에서 로그인 클릭을 위해 창 크기를 늘립니다.
WebDriverWait(driver, DELAY).until(expected_conditions.element_to_be_clickable((By.XPATH, '//a[@id="sign-in-button"]')))
driver.find_element_by_xpath('//a[@id="sign-in-button"]').click()
WebDriverWait(driver, DELAY).until(expected_conditions.element_to_be_clickable((By.XPATH, '/html/body/main/div/div/div/div/div/div/form/div[2]/div/div[1]/a')))
driver.find_element_by_xpath('/html/body/main/div/div/div/div/div/div/form/div[2]/div/div[1]/a').click()

# Google ID 입력
WebDriverWait(driver, DELAY).until(expected_conditions.visibility_of_all_elements_located((By.XPATH, '//input[@id="identifierId"]')))
driver.find_element_by_xpath('//input[@id="identifierId"]').send_keys(GOOGLE_ID)
WebDriverWait(driver, DELAY).until(expected_conditions.element_to_be_clickable((By.XPATH, '//div[@id="identifierNext"]')))
driver.find_element_by_xpath('//div[@id="identifierNext"]').click()

# Google Password 입력
WebDriverWait(driver, DELAY).until(expected_conditions.visibility_of_all_elements_located((By.XPATH, '//div[@id="password"]//input[@name="password"]')))
driver.find_element_by_xpath('//div[@id="password"]//input[@name="password"]').send_keys(GOOGLE_PW)
WebDriverWait(driver, DELAY).until(expected_conditions.element_to_be_clickable((By.XPATH, '//div[@id="passwordNext"]')))
driver.find_element_by_xpath('//div[@id="passwordNext"]').click()